
Install Guide
Installation Type A: Gateway

-
Connect a network cable from the WAN port on the DrawBridge to a LAN port on your modem (or the only network port on single-port modems). By default, the DrawBridge WAN interface is configured to pull an IP address via DHCP.
-
Connect a computer directly to the LAN port of the DrawBridge. By default, DHCP is enabled, and your computer should receive an IP address automatically. Load the Webconfig page https://draw.bridge:81 and click through the browser security warning; use Advanced if needed. (The self-signed security certificate practice is typical for network management interfaces using HTTPS; browsers simply don't recognize them as legitimate, though the traffic is still encrypted.)
-
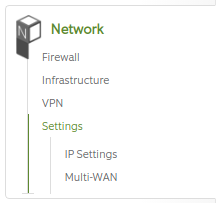
Network interface configuration:

Navigate to Network / Settings / IP Settings, and edit the interface with the role of LAN to your desired IP address/subnet.
- Note that you will then need to re-enable the DHCP service if you change the LAN subnet the unit is configured for.
- A system restart after a LAN IP address change is strongly recommended: press the power button on the unit and wait up to 3 minutes for it to turn itself off. Then press the power button to turn it back on again.
-
DHCP Configuration
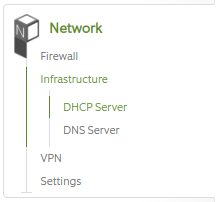
Navigate to Network / Infrastructure / DHCP Server, and click Configure or Edit on the interface/subnet you wish to modify. This will take you to a new page. Change the DHCP settings to your preference and click Update. The settings will take effect immediately.
-
All done!

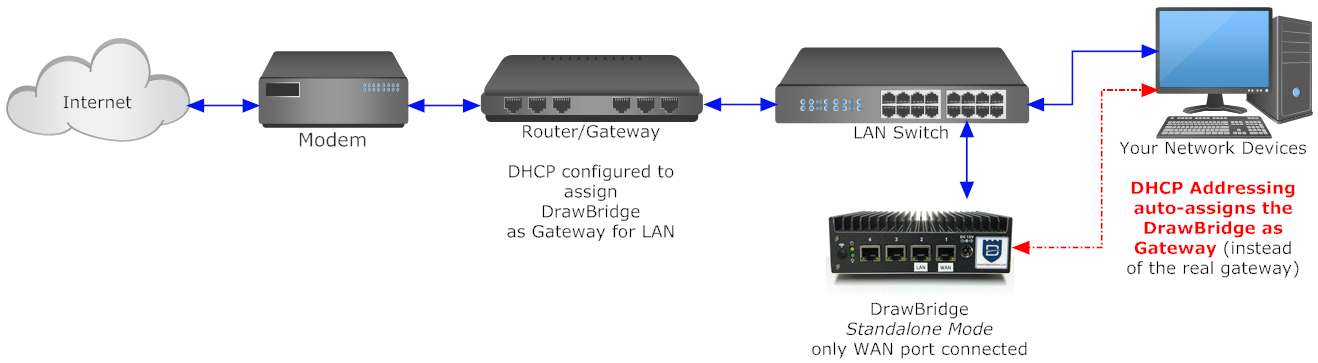
Installation Type B: Alternate Gateway
-
Connect a computer directly to the LAN port of the DrawBridge, and load the ClearOS Webconfig interface with the information provided on the network + credentials paper included in the DrawBridge box.
-
DHCP configuration:
Refer to the information you collected in section 2 above: if you are planning to continue using existing equipment for DHCP on your network, DHCP will need to be Disabled on the DrawBridge. Navigate to Network / Infrastructure / DHCP, and click Delete on any existing DHCP line. (The interface will show a
Configurebutton if DHCP is not set up on that interface.) -
Mode configuration: in the ClearOS Webconfig panel, navigate to Network / Settings / IP Settings and ensure that the ClearOS Network mode is set to Standalone Mode - No Firewall.
-
Network interface configuration: Alternate Gateway installations only require one interface to be configured, with a role of External. Navigate to Network / Settings / IP Settings and ensure that the IP address on the interface configured with a role of External matches your desired setting. If you plan to assign the DrawBridge interface an address via DHCP, edit the External interface accordingly. After all this is properly configured, click Delete on any interface configured with a LAN role. This will drop the connection to your computer, which you can disconnect at this point.
-
Connect the WAN/External interface of the DrawBridge to a free port on your network switch.
-
Finally, configure your existing DHCP server to hand out the DrawBridge External interface IP address as the Gateway for the network. Note that this will take effect on a per-computer basis when they re-request an IP address via DHCP. To speed this process up, simply disconnect and reconnect the network cables for your computers (or power-cycle the switch). All network traffic will then begin to route through the DrawBridge.
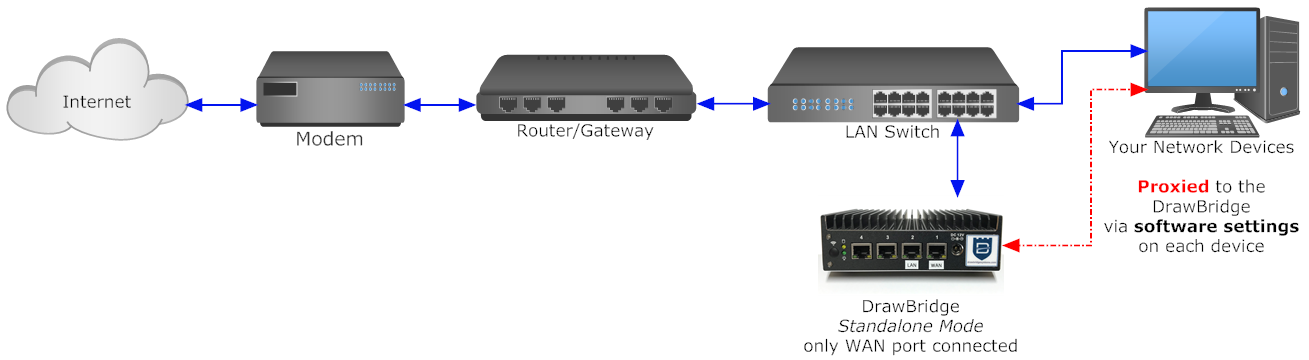
Installation Type C: Proxy
-
Connect a computer directly to the LAN port of the DrawBridge, and load the ClearOS Webconfig interface with the information provided on the network + credentials paper included in the DrawBridge box.
-
DHCP configuration:
Generally the DrawBridge doesn't handle DHCP if it is installed as a Proxy. Disable DHCP, or verify it is already disabled by navigating to Network / Infrastructure / DHCP and looking at the interface configuration lines. They will show a
Configurebutton if DHCP is not set up on that interface. If DHCP is configured for an interface, remove it by clicking theDeletebutton. -
Mode configuration: in the ClearOS Webconfig panel, navigate to Network / Settings / IP Settings and ensure that the ClearOS Network mode is set to Standalone Mode - No Firewall.
-
Network interface configuration:
Proxy installations only require one interface to be configured, with a role of External. Navigate to Network / Settings / IP Settings and ensure that the IP address on the interface configured with a role of External matches your desired setting. If you plan to assign the DrawBridge interface an address via DHCP, edit the External interface accordingly. After all this is properly configured, click Delete on any interface configured with a LAN role. This will drop the connection to your computer, which you can disconnect at this point.
-
Connect the WAN/External interface of the DrawBridge to a free port on your network switch.
-
Configure your client devices to use the DrawBridge as a proxy to access the internet.