Back up your Mac with Time Machine
Learn how to create a backup of the files on your Mac: Use Time Machine, the built-in backup feature of your Mac, to automatically back up your personal data, including apps, music, photos, email, and documents. Having a backup allows you to restore your Mac from a Time Machine backup if you ever delete your files or can't access them.
Connect a storage device to use for backups
Connect an external storage device to your Mac, such as a USB drive or Thunderbolt drive. Or learn about other backup disks that you can use with Time Machine.
- Use this storage device only as your Time Machine backup disk, not for storage of other files.
- Ideally, your backup disk should have at least twice the storage capacity of every disk or volume you're backing up. If your backup disk doesn't have enough storage space to contain a complete backup, Time Machine will let you know.
Select your storage device in Time Machine settings
When you connect the storage device to your Mac, your Mac might ask if you want to use it for Time Machine backups. If it doesn't ask, follow these steps.
- Open Time Machine settings:
- macOS Ventura or later: Choose Apple menu > System Settings, click General in the sidebar, then click Time Machine on the right.
- Earlier versions of macOS: Choose Apple menu > System Preferences, then click Time Machine.
- In Time Machine settings, select your external storage device as your backup destination:
- macOS Ventura or later: Click the add button (+), then follow the onscreen instructions.
- Earlier versions of macOS: Click Select Backup Disk, then follow the onscreen instructions.
- If the storage device contains Time Machine backups from another Mac, you might be asked to claim the existing backups so that they become part of the backups for this Mac. Or you can choose to start a new backup instead.
Make a backup
Back up automatically. After you select your storage device in Time Machine settings, Time Machine automatically begins making periodic backups.
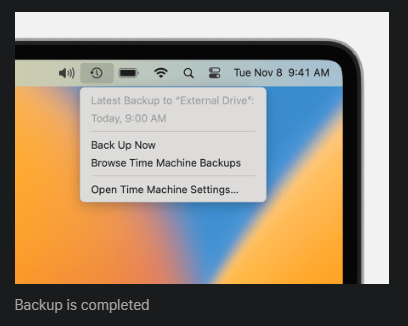
Back up manually. To start a backup manually, without waiting for the next automatic backup, choose Back Up Now from the Time Machine menu in the menu bar.
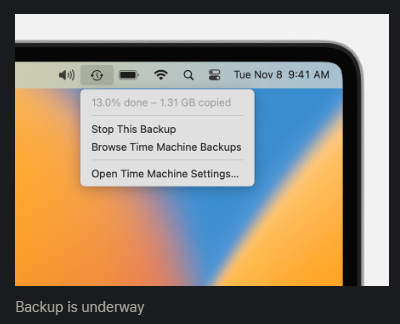
Check backup status. Use the Time Machine menu in the menu bar to check the status of a backup or skip a backup in progress. For example, if a backup is underway, the menu shows how much of it is done. When a backup is not underway, the menu shows the date and time of the latest backup.
Backup frequency and duration
Time Machine makes hourly backups for the past 24 hours, daily backups for the past month, and weekly backups for all previous months. The oldest backups are deleted when your backup disk is full.
Beginning with macOS Ventura, you can change the backup frequency: Open Time Machine settings, click Options, then choose a setting from the “Back up frequency” menu.
The first backup might take a long time, but you can continue using your Mac while a backup is underway. Time Machine backs up only the files that changed since the previous backup, so future backups will be faster.
Troubleshooting: If a Time Machine backup takes longer than you expect.
Learn more
- To exclude items from backups, open Time Machine settings, click Options, then click the add (+) button to add an item to be excluded. To stop excluding an item, select the item and click the remove (–) button.
- If you back up to multiple disks, you can press and hold the Option key, then choose Browse Other Backup Disks from the Time Machine menu.
-
Learn about other ways to back up and restore files.
- Information about products not manufactured by Apple, or independent websites not controlled or tested by Apple, is provided without recommendation or endorsement. Apple assumes no responsibility with regard to the selection, performance, or use of third-party websites or products. Apple makes no representations regarding third-party website accuracy or reliability. Contact the vendor for additional information.
Credits: Content from Apple Support documentation.


