
New Page
Apple Configurator User Guide for iPhone
Devices that can be enrolled
You can add the following to Apple School Manager, Apple Business Manager, or Apple Business Essentials using Apple Configurator on your iPhone, even if the devices weren’t purchased directly from Apple or an Apple Authorized Reseller or cellular carrier:
-
iPhone
-
iPad
-
Mac computers with Apple silicon or with an Apple T2 Security Chip
30 Day Release period disclaimer
When a device is set up this way, it behaves like any other device already in Apple School Manager, Apple Business Manager, or Apple Business Essentials, with mandatory supervision and mobile device management (MDM) enrollment. The user of that device then has a 30-day provisional period to release the device from Apple School Manager, Apple Business Manager, or Apple Business Essentials, supervision, and MDM.
This 30-day provisional period begins after the device successfully assigned to and enrolled in:
-
A third-party MDM server linked to Apple School Manager, Apple Business Manager or Apple Business Essentials.
-
The device management that’s built in to Apple Business Essentials.
- (Note: To identify your Mac model, see the Apple Support articles Mac computers with Apple silicon or Mac models with the Apple T2 Security Chip.)
Minimum Requirements
To enroll Mac
- Mac running macOS 12.0.1 or newer
- iPhone with Apple configurator installed running iOS 15 or newer
- Enrollment starts from the "Select your Country or Region" Setup assistant pane after factory reset.
To enroll iPhone
- iPhone running iOS 16 or newer
- iPhone with Apple configurator installed running iOS 16 or newer
- Enrollment starts from the "Choose a Wi-Fi Network" Setup assistant pane after factory reset.
To enroll iPad
- iPad running iPadOS 16 or newer
- iPhone with Apple configurator installed running iOS 16 or newer
- Enrollment starts from the "Choose a Wi-Fi Network" Setup assistant pane after factory reset.

Before you add a Mac
Take these additional steps before you add a Mac:
-
Decide how you want the Mac to connect to the internet, then either create a configuration profile or gather the necessary adapters and cables.
-
Share the Wi-Fi network credentials (default method): This requires that the iPhone is connected to a Wi-Fi network with access to the internet. The Mac will use the same network credentials when it starts.
-
Use a network configuration profile: This requires that you create a configuration profile with a Wi-Fi or 802.1X payload containing the appropriate network credentials and saved in a location in the Files app. You can then configure it in Apple Configurator > Settings. See Create and edit configuration profiles in Apple Configurator in the Apple Configurator User Guide.
- Note: If necessary, you can add a certificate payload for use with Wi-Fi or 802.1X authentication to the configuration profile. See Certificates MDM payload settings for Apple devices in Apple Platform Deployment.
-
Connect the Mac to the internet using an Ethernet connection: This requires that the Mac is connected to the internet before assigning it to Apple School Manager, Apple Business Manager, or Apple Business Essentials.
-
Sign in to Apple School Manager, Apple Business Manager, or Apple Business Essentials
-
Make sure your iPhone can access the internet through a Wi-Fi network or a cellular connection, then launch Apple Configurator on your iPhone.
-
Enter your Managed Apple ID. You must have a role that allows Apple devices to be assigned to Apple School Manager, Apple Business Manager, or Apple Business Essentials, such as Administrator, Site Manager (Apple School Manager only), or Device Enrollment Manager.
- Note: This will be the same credetuals you would use in Apple Configurator 2 for authentication with the Compass ABM account when enrolling iDevices
-
If necessary, go to Apple Configurator > Settings, then select the network configuration profile to use.
Add an iPhone or iPad
You can add a new or erased iPhone or iPad.
- Start up the iPhone or iPad.
- Continue through the Setup Assistant, then stop when you see the Choose a Wi-Fi Network pane.
- Note: You must restart the iPhone or iPad if you go past the Choose a Wi-Fi Network pane.
- Bring your iPhone with Apple Configurator close to the iPhone or iPad, then do one of the following:
- Scan the image that appears in Setup Assistant.
- Tap Pair Manually in the lower-left corner of the Setup Assistant, then tap Manual Pairing in Apple Configurator and enter the six-digit code that appears.
- Note: If Setup Assistant doesn’t show the pairing pane on the iPhone or iPad you want to add, return to the Home Screen on your iPhone, then tap the Apple Configurator app again.
- At this poimnt the serial number and other information about the iPhone or iPad are uploaded to Apple School Manager, Apple Business Manager, or Apple Business Essentials.
- Wait for the process to complete, then tap Erase and Shut Down.
- The next step must be performed by a Compass Foundation Tech so contact Compass Foundation and wait for their responce before proceeding.
- After you have direction from Compass to proceed, restart the iPhome or iPad and complete the device setup.
- If you did not get the prompt to accept and install the management profiles from Maranatha Fellowship, factory reset the device again But DO NOT re-enroll with Apple Configurator app again at this point.
- You should get the prompt to install management profiles during the setup sequence just after connecting to Wi-Fi
Add a new Mac
- If you’ve purchased a new Mac and haven’t yet started it up, you can begin.
- If you’re adding a Mac portable, plug the Mac into a power source so it doesn’t go to sleep during the process.
- If the Mac is connecting to the internet using Ethernet, plug in all necessary cables and adapters.
- Start up the Mac.
- Select the language in Setup Assistant, click Continue, then stop when you see the Country or Region pane.
- Note: You must restart the Mac if you go past the Country or Region pane.
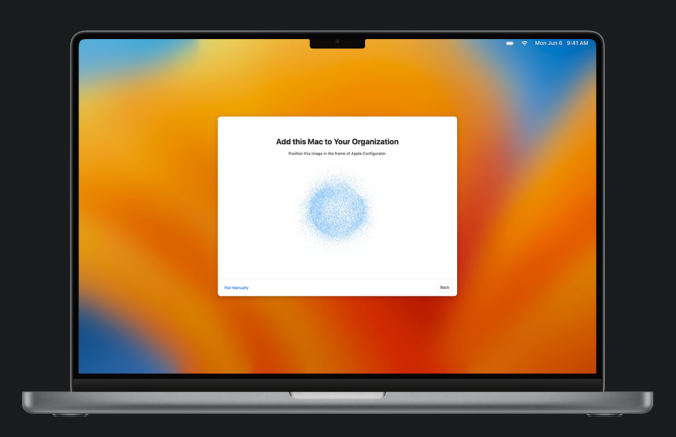
- Bring your iPhone close to the Mac, then do one of the following:
- Scan the image that appears in Setup Assistant.
- Click Pair Manually in the lower-left corner of the Setup Assistant, then tap Manual Pairing in Apple Configurator and enter the six-digit code that appears.

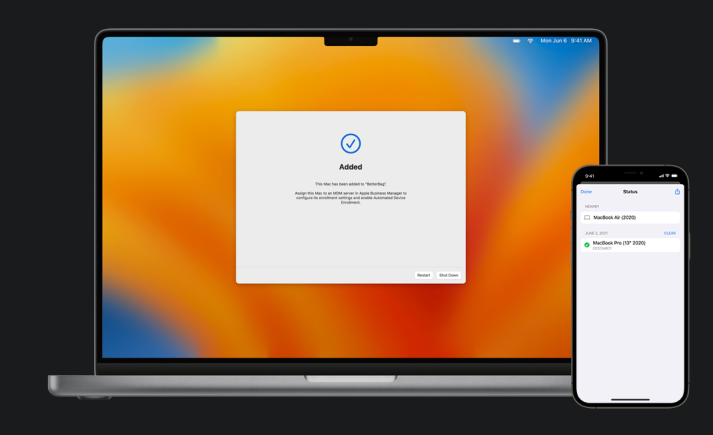
- The serial number and other information about the Mac are uploaded to Apple School Manager, Apple Business Manager, or Apple Business Essentials.
- Wait for the process to complete, then click Shut Down to turn off the Mac.

- The next step must be performed by a Compass Foundation Tech so contact Compass Foundation and wait for their responce before proceeding.
- After you have direction from Compass to proceed, restart the Mac and complete the device setup.
- If you did not get the prompt to accept and install the management profiles from Maranatha Fellowship, factory reset the device again But DO NOT re-enroll with Apple Configurator app again at this point.
- You should get the prompt to install management profiles during the setup sequence just after connecting to the internet.
Add a Mac that’s configured / setup and in use.
- If you want to add a Mac that’s currently configured, you MUST first erase all content and settings.
- Important: All your data will be erased. Make sure you have an up-to-date backup of your data because it will all be erased.
- If you’re adding a Mac portable, plug the Mac into a power source so it doesn’t go to sleep during the process.
- If the Mac is connecting to the internet using Ethernet, plug in all necessary cables and adapters.
- Do one of the following:
- If your Mac has macOS 13 or later: Choose Apple menu > System Settings, click General , click Transfer or Reset, then click Erase All Content and Settings.
- If your Mac has macOS 12 or earlier: Choose Apple menu > System Preferences, then in the menu bar, choose System Preferences > Erase All Content and Settings.
- In Erase Assistant, enter your administrator information.
- Review items that will be removed in addition to your content and settings.
- If your Mac has multiple user accounts, click the arrow next to your account name to review the items.
- Click Continue, then follow the onscreen instructions.
-
Note: If your version of macOS has been modified, Erase Assistant can’t erase your Mac and displays an alert indicating you need to first reinstall macOS. For more information, see Erase and reinstall macOS (https://support.apple.com/guide/mac-help/mh27903).
-
- Wait for the Mac to restart.
- Select the language in Setup Assistant, click Continue, then stop when you see the Country or Region pane.
- Note: You must restart the Mac if you go past the Country or Region pane.
- Bring your iPhone close to the Mac, then do one of the following:
- Scan the image that appears in Setup Assistant.
- Click Pair Manually in the lower-left corner of the Setup Assistant, then tap Manual Pairing in Apple Configurator and enter the six-digit code that appears.
- The serial number and other information about the Mac are uploaded to Apple School Manager, Apple Business Manager, or Apple Business Essentials.
- Wait for the process to complete, then click Shut Down to turn off the Mac.
- The next step must be performed by a Compass Foundation Tech so contact Compass Foundation and wait for their responce before proceeding.
- After you have direction from Compass to proceed, restart the Mac and complete the device setup.
- If you did not get the prompt to accept and install the management profiles from Maranatha Fellowship, factory reset the device again But DO NOT re-enroll with Apple Configurator app again at this point.
- You should get the prompt to install management profiles during the setup sequence just after connecting to the internet.
After this should be internal only
Assign an iPhone, iPad, or Mac to an MDM server
-
Make sure you’ve properly configured your MDM solution so that it contains enrollment settings and an enrollment profile for the device.
-
Sign in to Apple School Manager , Apple Business Manager , or Apple Business Essentials.
-
Select Devices from the sidebar, then use the filter to show only “Devices added by Apple Configurator.”
- The device should appear in the list. You may need to refresh the list of devices before the newly added appears.
-
You can now transfer the device to an existing MDM server in Apple School Manager, Apple Business Manager, or Apple Business Essentials. For more information, see:
- Assign, reassign, or unassign devices in Apple School Manager
- Assign, reassign, or unassign devices in Apple Business Manager
- Assign, reassign, or unassign devices in Apple Business Essentials
-
After the device is assigned to an MDM server, you can restart the Mac to enroll it in MDM.