Install your DrawBridge
Step-by-step information to set up your DrawBridge on your network.
- Introduction and Install Checklist
- Pre-install Preparation
- Install Guide
- Optional: Enable Remote Device Filtering
- Optional: Optimize Local Device Detection
Introduction and Install Checklist
Introduction
The DrawBridge is a web content filter running on the DrawBridgeOS Linux distribution (Debian-based; as-of February 2023. Units deployed prior to that timeframe were running on ClearOS, a RHEL-based distribution).
In addition to the content filter service, DrawBridgeOS can also perform the following functions:
- DHCP (enabled by default)
- DNS (enabled by default)
- Firewall (when Gateway)
- Port Forwarding (when Gateway)
- VPN server (Wireguard, OpenVPN, and IPSEC support)
DrawBridgeOS systems have one web panel
- https://draw.bridge - content filter settings
Legacy ClearOS-based DrawBridge systems have two separate web panels
- https://draw.bridge - content filter and QoS settings
- https://draw.bridge:81 - ClearOS (operating system) network configuration settings
Note: The https://draw.bridge web address is only valid inside your network (it is not reachable from other computers on the internet). If this does not work, you can also use the IP address of the unit (however you should configure your DNS properly so that it does work).
Supported client operating systems
Supported Desktop Operating Systems
- Windows
- MacOS
- Linux
Provisionally-supported Desktop Operating Systems
-
ChromeOS
(Certificate-trust is limited to the browser; key domains must be unfiltered for OS operation, therefore potentially reducing filter effectiveness.)
Supported Mobile Operating Systems
- iPhoneOS/iPadOS
Unsupported Mobile Operating Systems
- Android 7 and newer.
All operating systems must have the DrawBridge CA certificate installed for proper functionality!
Google products (ChromeOS and Android) limit application trust of user-installed CA certificates, therefore causing those platforms to be provisionally-supported or unsupported.
Read more: Certificate Trust Changes in Android v7 and newer
Installation Checklist
This is a high-level overview/checklist of essential tasks that need performed to install the DrawBridge on your network.
-
Install the DrawBridge CA Certificate on all devices: visit the Certificates panel on one of our cloud servers, below, and follow the correct steps to install the DrawBridge CA Certificate for your device.
-
Decide on Installation Type
- Gateway (recommended)
- Alternate Gateway
- Proxy
-
Collect IP addresses and credentials for existing network infrastructure equipment (modems, routers, managed switches, wireless routers/access points, and servers) as applicable.
-
Install the DrawBridge: Reconfigure the network to accomodate your installation type. For example, if you opted to install as Gateway, replace your primary router with the DrawBridge and disable DHCP on wireless router if continuing to use it as wireless access point
-
Ensure DNS is properly configured:
- Gateway setups: In most situations the DrawBridge is also the DHCP and DNS server for the network, so no additional configuration is required.
- Alternate Gateway/Proxy setups: ensure that your local DNS server resolves the following domains to the LAN IP address of the DrawBridge:
-
draw.bridge -
<systemname>.drawbridge.systems -
<systemname>.orbitmobile.network -
<systemname>.passageway.id -
<systemname>.compassfoundation.systems(soon to be deprecated)
-
-
Test your installation: Navigate to popular websites to ensure they work as expected. Getting security errors in device browsers? Ensure the DrawBridge CA Certificate is installed as detailed in #1, above. Alternatively, you can visit your local DrawBridge web console SSL Certificates dashboard when on your DrawBridge LAN and follow the certificate installation steps.
-
Notify your users: Communicate to your users that their network activity is monitored and recorded. If you have company documents (eg. Employee Handbook), update as needed to properly disclose network activity monitoring and recording.

Optional:
- Enable remote-device access by configuring Port Forwarding or DMZ on your modem (if not Bridged) or Firewall. Note: requires publicly-routable IP address from your Internet provider.
-
"Harden"/Secure configuration: (make bypassing the DrawBridge difficult)
- Gateway setups: disable WiFi and DHCP on the (upstream) modem
- Alternate Gateway/Proxy setups: block 80/443 TCP and UDP in your gateway firewall to enforce proxy settings on clients
Pre-install Preparation
Pick an Installation Type
A. Gateway:

- ClearOS webconfig network mode: Gateway
- In this configuration, the DrawBridge uses one network interface set to External and one network interface set to LAN and becomes the Gateway for your network. This ensures that all devices that connect to your network are filtered by default. However, if you prefer to use a different device as the network gateway and/or wish to only filter a specific subset of devices out of all the devices on your network, select installation type (B) Alternate Gateway or (C) Proxy.
B. Alternate Gateway:
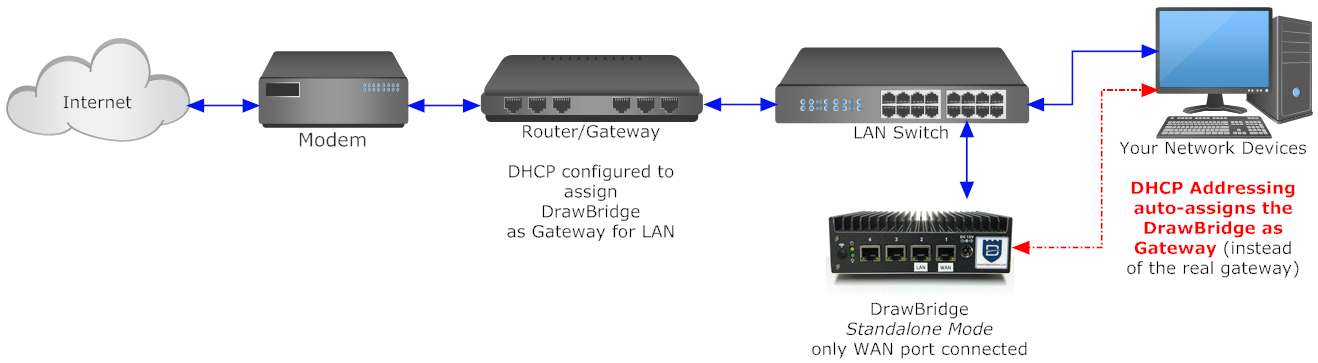
- ClearOS webconfig network mode: Standalone Mode; No Firewall
- In this configuration, the DrawBridge is configured with one network interface as External. The DHCP server for the network is configured to hand out the DrawBridge IP address as the Gateway IP for a specified device group. The DrawBridge WAN/External interface is connected to the real gateway of the network.
Note that you are not able to forward ports to equipment using the DrawBridge as the (alternate) gateway without custom route configuration. Contact Compass Support for more details.
It is your responsibility to properly protect the network with a firewall at gateway.
C. Proxy:
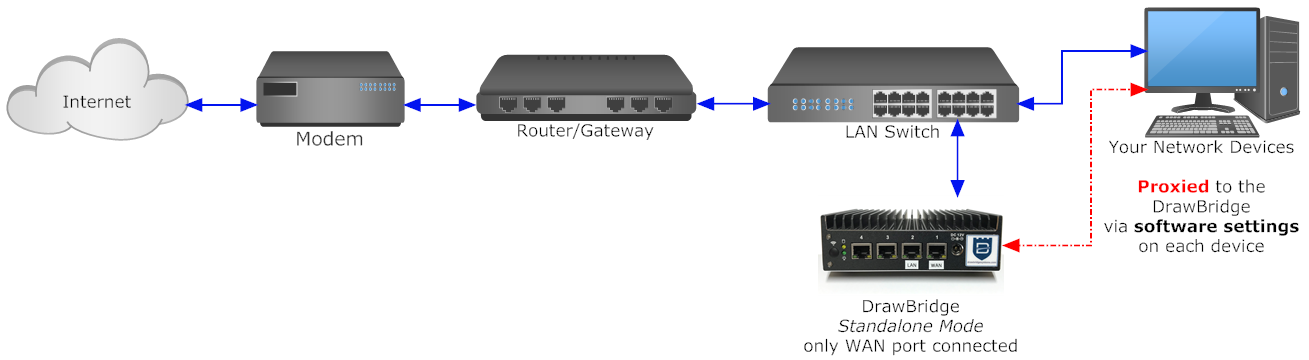
- ClearOS webconfig network mode: Standalone Mode; No Firewall
- In this configuration, the DrawBridge uses one network interface set to External. It is your responsibility to configure your endpoints with proxy settings either individually or via Group Policy where available.
It is your responsibility to properly protect the network with a firewall at gateway.
Prepare your network
It's essential to know how your network is configured prior to starting a DrawBridge installation. We recommend that you:
- Perform a network scan of your existing setup. A good tool for this is the free Advanced IP Scanner, available here. Run the scan and take note of the IP addresses of your devices. Save or print the scan output for your future reference. In some situations, it is important that specific computers (such as servers) and printers maintain the same IP address across network infrastructure changes to ensure the most seamless migration.
- Locate the web configuration panels for your existing network infrastructure (modem, wireless routers/access points, firewalls, managed switches, etc) and ensure you have the correct login credentials available.
- Determine what device is the existing gateway
- Determine what device is the existing DNS and DHCP server. Generally, on most Small Office/Home Office networks, these services are handled by the same unit as the gateway. You can check this by opening Network Connections (Windows) --
ncpa.cplin the Start Menu search box -- and right-clicking the network adapter in use at the moment, clicking Status, and then Details. Note the IP address shown for the gateway, and compare it to the IP addresses for DHCP and DNS. Again, on most small networks, these will all be the same IP address. - Install the DrawBridge CA Certificate on all devices: visit the Certificates panel on one of our cloud servers: (eg. whitespire or sweetspire) and follow the correct steps to install the DrawBridge CA Certificate for your device.
Install Guide
Installation Type A: Gateway
-
Connect a network cable from the WAN port on the DrawBridge to a LAN port on your modem (or the only network port on single-port modems). By default, the DrawBridge WAN interface is configured to pull an IP address via DHCP.
-
Connect a computer directly to the LAN port of the DrawBridge. By default, DHCP is enabled, and your computer should receive an IP address automatically. Load the Webconfig page https://draw.bridge:81 and click through the browser security warning; use Advanced if needed. (The self-signed security certificate practice is typical for network management interfaces using HTTPS; browsers simply don't recognize them as legitimate, though the traffic is still encrypted.)
-
Network interface configuration:

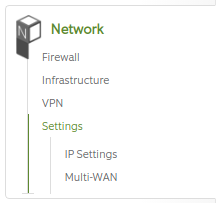
Navigate to Network / Settings / IP Settings, and edit the interface with the role of LAN to your desired IP address/subnet.
- Note that you will then need to re-enable the DHCP service if you change the LAN subnet the unit is configured for.
- A system restart after a LAN IP address change is strongly recommended: press the power button on the unit and wait up to 3 minutes for it to turn itself off. Then press the power button to turn it back on again.
-
DHCP Configuration

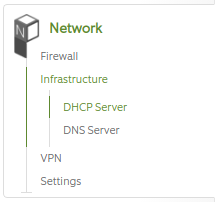
Navigate to Network / Infrastructure / DHCP Server, and click Configure or Edit on the interface/subnet you wish to modify. This will take you to a new page. Change the DHCP settings to your preference and click Update. The settings will take effect immediately.
-
All done!
Installation Type B: Alternate Gateway
-
Connect a computer directly to the LAN port of the DrawBridge, and load the ClearOS Webconfig interface with the information provided on the network + credentials paper included in the DrawBridge box.
-
DHCP configuration:
Refer to the information you collected in section 2 above: if you are planning to continue using existing equipment for DHCP on your network, DHCP will need to be Disabled on the DrawBridge. Navigate to Network / Infrastructure / DHCP, and click Delete on any existing DHCP line. (The interface will show a
Configurebutton if DHCP is not set up on that interface.) -
Mode configuration: in the ClearOS Webconfig panel, navigate to Network / Settings / IP Settings and ensure that the ClearOS Network mode is set to Standalone Mode - No Firewall.
-
Network interface configuration: Alternate Gateway installations only require one interface to be configured, with a role of External. Navigate to Network / Settings / IP Settings and ensure that the IP address on the interface configured with a role of External matches your desired setting. If you plan to assign the DrawBridge interface an address via DHCP, edit the External interface accordingly. After all this is properly configured, click Delete on any interface configured with a LAN role. This will drop the connection to your computer, which you can disconnect at this point.
-
Connect the WAN/External interface of the DrawBridge to a free port on your network switch.
-
Finally, configure your existing DHCP server to hand out the DrawBridge External interface IP address as the Gateway for the network. Note that this will take effect on a per-computer basis when they re-request an IP address via DHCP. To speed this process up, simply disconnect and reconnect the network cables for your computers (or power-cycle the switch). All network traffic will then begin to route through the DrawBridge.
Installation Type C: Proxy
-
Connect a computer directly to the LAN port of the DrawBridge, and load the ClearOS Webconfig interface with the information provided on the network + credentials paper included in the DrawBridge box.
-
DHCP configuration:
Generally the DrawBridge doesn't handle DHCP if it is installed as a Proxy. Disable DHCP, or verify it is already disabled by navigating to Network / Infrastructure / DHCP and looking at the interface configuration lines. They will show a
Configurebutton if DHCP is not set up on that interface. If DHCP is configured for an interface, remove it by clicking theDeletebutton. -
Mode configuration: in the ClearOS Webconfig panel, navigate to Network / Settings / IP Settings and ensure that the ClearOS Network mode is set to Standalone Mode - No Firewall.
-
Network interface configuration:
Proxy installations only require one interface to be configured, with a role of External. Navigate to Network / Settings / IP Settings and ensure that the IP address on the interface configured with a role of External matches your desired setting. If you plan to assign the DrawBridge interface an address via DHCP, edit the External interface accordingly. After all this is properly configured, click Delete on any interface configured with a LAN role. This will drop the connection to your computer, which you can disconnect at this point.
-
Connect the WAN/External interface of the DrawBridge to a free port on your network switch.
-
Configure your client devices to use the DrawBridge as a proxy to access the internet.
Optional: Enable Remote Device Filtering
If your modem is performing NAT, or you are using other equipment for your network gateway, it is essential to turn on DMZ or Port Forwarding on the gateway to the DrawBridge WAN/External interface IP address to enable Remote Device access.
Required Remote Device Ports
| Port | Protocol | Service | Accessible From | Notes |
|---|---|---|---|---|
| 1525 | TCP | PAC | All IP's/Everywhere | Proxy PAC (HTTPS) |
| 6502 | TCP | Redwood | All IP's/Everywhere | Proxy PAC (HTTP) |
| 25000-29000 | TCP | Redwood | All IP's/Everywhere | Per-device authentication |
Implementation
The ports above must be open in the ClearOS Incoming Firewall. The following sections assume that has been done.
Installation Type A:
DrawBridge Gateway situations
- Fiber and Cable modems: We recommend you use DMZ on the modem for the IP address the DrawBridge is using for its WAN interface. Note that you'll need to ensure the WAN interface IP address doesn't change, either by configuring the interface on the DrawBridge to a static IP or by configuring a DHCP reservation for the IP address in the modem DHCP settings.
- DSL modems: We recommend you use port-forwarding on the modem for the IP address the DrawBridge is using for its WAN interface. (DMZ is usually unreliable on DSL modems for some unknown reason.) Configure the Port Forwarding in the modem per the Required Remote Device Ports list, above.
- Fixed Wireless: Either DMZ or port forwarding will work. Usually you'll need to contact your fixed wireless provider to have them set up these features for you. Have them forward the ports in their equipment per the Required Remote Device Ports list, above.
FAQ: Why aren't you recommending Bridge mode? You're recommending Double-NAT!
Yes. The reason is that most Internet Service Providers lose access to the diagnostic functionality on their equipment when it is in Bridge Mode. If you call them up about an issue, they'll simply have you reset the modem, which may "fix" an issue, but hide the root cause (such as recurring timing errors on cable networks, etc).
This Double-NAT configuration method works well, despite not following the typical recommended industry "best practices". If you wish to use Bridge mode instead, you are certainly welcome to do so.
Installation Types B and C:
DrawBridge non-gateway situations (other equip at actual gateway)
- Configure port forwarding on your gateway equipment (per the Required Remote Device Ports info, above) to the DrawBridge WAN/External network interface IP address.
WARNING:
For Installation types B and C, Do Not place the DrawBridge in a DMZ, as this will leave the DrawBridge unprotected from incoming threats!
Optional: Optimize Local Device Detection
About Local Device Detection
The DrawBridge attempts to detect all the Devices on a local network, and then creates associated Local Device records in the Console accordingly. However, on networks where there is frequent turnover of devices, these records can quickly become outdated. If you have custom filter actions assigned to a specific device/device group, it is essential that the IP address of the device(s) do not change to ensure the policy takes effect as expected.
To ensure expected filter behavior, we recommend that you assign DHCP reservations for any device for which you want to assign a custom policy. Note, however the section below regarding complications with mobile device operating systems.
Mobile device randomized MAC/Hardware addresses
Android, Apple, and some Windows devices use randomized interface hardware (MAC) addresses for increased privacy across various networks. In general, this is a good thing, however the unintended consequence can be that over time you end up with varied IP addresses (and therefore additional detected Local Devices) on your DrawBridge than you actually have number of devices.
Solution: disable randomized MAC/Hardware addresses on your device for your WiFi network.
-
Android devices: Go to Settings, WiFi, tap on the settings gear for your WiFi network, expand out Advanced Settings, and tap on Privacy. Select
Use Device MAC -
Apple devices: Go to Settings, WiFi, tap on your WiFi network and toggle off
Private Addressesfor your network. -
Windows devices: Go to Settings, Network and Internet, WiFi, click on Advanced Options under the list of WiFi networks, and toggle off
Random Hardware Addresses. Note that not all Windows network adapters support this function, so it might not show up on your device.
Windows Server Environments
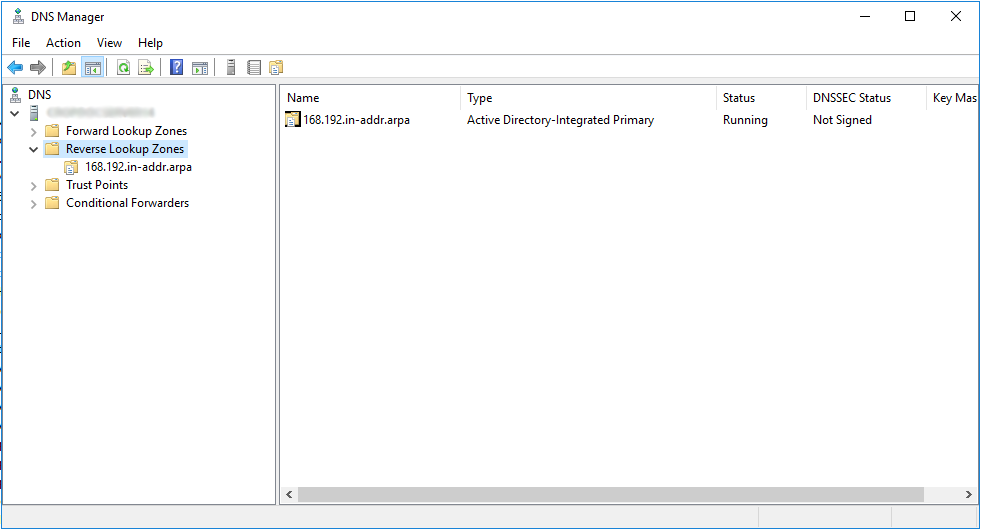
If you are using a Windows Active Directory server on your network, the DrawBridge can query that for more device information.
- Set up a Reverse Lookup Zone for your local network, as shown in this screenshot.

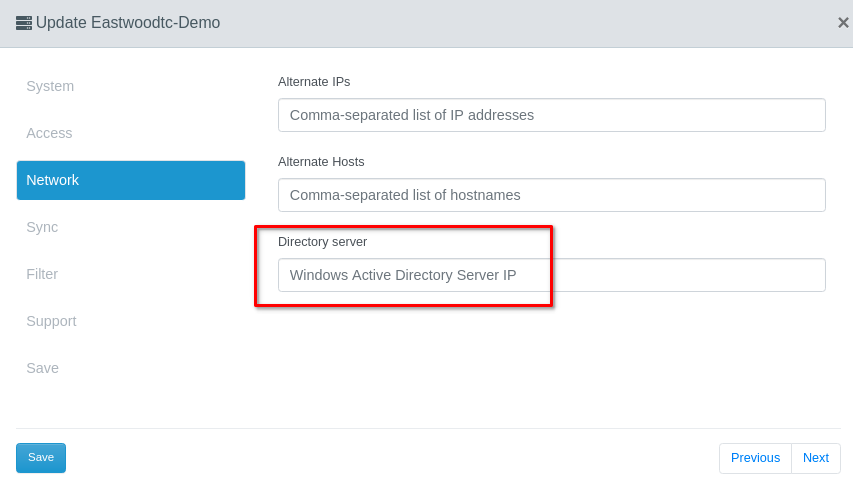
- In the DrawBridge Console, go to
System / Configuration / Local Settingsand click the green Edit button. Then click on the Network sub-item in the popup window, and enter the IP address of your Directory Server in the correct field.
- Click Save. Now your DrawBridge will be able to query the Directory server for the IP address of local hostnames.