
Adding a Mac (currently in-use)
If you want to add a Mac that’s currently configured, you MUST first erase all content and settings.
Important: All your data will be erased. Make sure you have an up-to-date backup of your data because it will all be erased!
-
If you’re adding a Mac portable, plug the Mac into a power source so it doesn’t go to sleep during the process.
-
If the Mac is connecting to the internet using Ethernet, plug in all necessary cables and adapters.
-
Do one of the following:
- If your Mac has macOS 13 or later: Choose
Apple menu > System Settings, clickGeneral, clickTransfer or Reset, then clickErase All Content and Settings. - If your Mac has macOS 12 or earlier: Choose
Apple menu > System Preferences. Then in the menu bar chooseSystem Preferences > Erase All Content and Settings. - If your Mac has a T2 security chip you will need to set the Security Utility to Full Security.
- If your Mac has macOS 13 or later: Choose
Info: The erase process includes signing out of the Mac with your Apple ID, so be sure to have the credentials available.
-
In Erase Assistant, enter your administrator information.
- If your Mac has multiple user accounts, click the arrow next to your account name to review the items.
-
Click Continue, then follow the onscreen instructions.
- Note: If your version of macOS has been modified, Erase Assistant can’t erase your Mac and displays an alert indicating you need to first reinstall macOS. For more information, see Erase and reinstall macOS.
-
Wait for the Mac to restart.
- To connect to Wi-Fi click the Wi-Fi symbol in the upper right corner of your screen and then select the connection you want to use. You will then be prompted for the Wi-Fi password.
- If an OS reinstall is needed it will do that at this point and depending on your internet speed this may take a bit of time. See Note above.
-
Select the language in Setup Assistant, click Continue, then stop when you see the Country or Region pane.
- Note: You must restart the Mac if you go past the Country or Region pane.
-
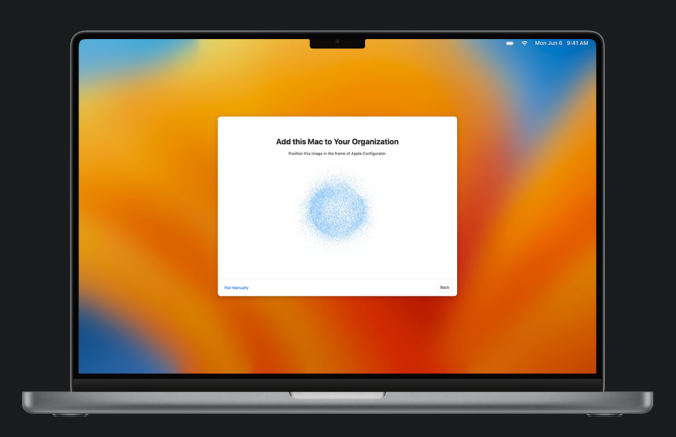
Bring your iPhone close to the Mac, then do one of the following:
- Scan the image that appears in Setup Assistant.
- Click Pair Manually in the lower-left corner of the Setup Assistant, then tap Manual Pairing in Apple Configurator and enter the six-digit code that appears.

- The serial number and other information about the Mac are uploaded to Apple Business Manager.
-
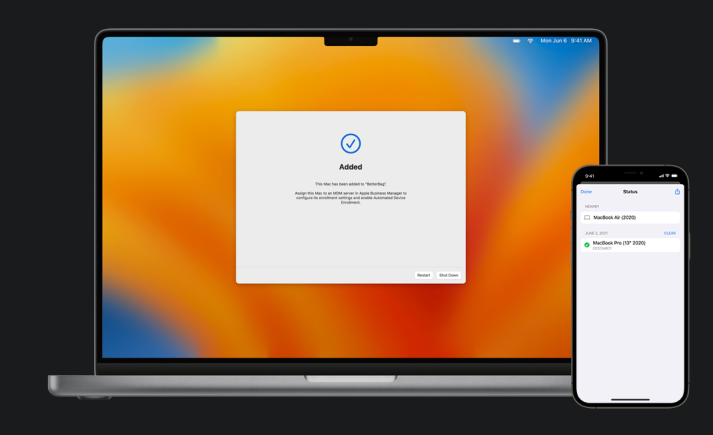
Wait for the process to complete, then click Shut Down to turn off the Mac.

-
a. If you set the MDM server in the Apple Configurator app proceeds to step 11a.
b. If did not set the MDM server the next step must be performed by a Compass Foundation tech: contact Compass Foundation and wait for their response before proceeding.
-
a. Restart the Mac, proceed through the device setup, and go to step 12.
b. After you have direction from Compass to proceed, restart the Mac and complete the device setup.
-
a.You should receive a prompt during the setup to install the management profiles. You will need to accept this installation which will complete the enrollment.
b. If you did not get this prompt, open terminal and run this command
sudo profiles renew -type enrollment. You will be asked for the device password. When entering, it will not show so just enter the password and click enter when complete. -
Now your computer, though managed, is still unfiltered. Next step: contact Compass Foundation to have the filter profile applied.
-
You may proceed with the backup restore at this point.
Credits: Source of the majority of content in this article: Apple Configurator User Guide for iPhone